Note
With SQL Server 2008, you can
also filter the jobs you want to script by using the filtering
capabilities that are available on the Object Explorer Details. For
example, you can filter on jobs whose names contain specific text. After
you filter the jobs, you can script the jobs that are displayed. The
filtering options and the capability to selectively script jobs are
particularly useful in environments in which many jobs and alerts exist.
Multiserver Job Management
Multiserver job management allows you to centralize the administration of multiple target servers on a single master
server. The master server is a SQL Server instance that contains the
job definitions and status information for all the enlisted target
servers. The target servers are SQL Server instances that obtain job
information from the master server and continually update the master
server with job statistics.
Multiserver job
management is beneficial in SQL Server environments in which there are
many instances to manage. You can establish jobs, operators, and
execution schedules one time on the master server and then deploy them
to all the target servers. This promotes consistency across the
enterprise and can ease the overall administrative burden. Without
multiserver job management, administrative jobs must be established and
maintained on each server.
Creating a Master Server
The first step in creating a
multiserver environment involves the creation of a master server. SQL
Server 2008 provides the Master Server Wizard, which simplifies this
task. You launch the Master Server Wizard by right-clicking the SQL Server Agent
node in the Object Explorer and selecting Multi Server Administration
and Make This a Master. The Master Server Wizard then guides you through
the creation of an operator to receive multiserver job notifications
and allows you to specify the target servers for SQL Server Agent jobs.
Figure 2
shows the Master Server Wizard screen that allows you to add
information related to the master server’s operator. The operator
created on the master server, named MSXOperator, is the only one that can receive notifications for multiserver jobs.

The
Master Server Wizard also validates the service accounts that the SQL
Server Agent uses on the target servers. These accounts are typically
Windows domain accounts that are in the same domain as the master
server. The service accounts are important because the target servers
utilize Windows security to connect to the master server and download
jobs for the SQL Server Agent. The validation process and security
considerations are simplified if the master server and target servers
are run with the same domain account.
Enlisting Target Servers
The Master Server Wizard
allows you to enlist one or more target servers. Enlisting a target
server identifies it to the master server and allows the master server
to manage the administration of its jobs. You can also enlist additional
target servers after the wizard completes. You do this by
right-clicking the SQL Server Agent
node of the target server and then selecting Multi Server
Administration and then Make This a Target. Doing so launches the Target
Server Wizard, which guides you through the addition of another target
server. The Target Server Wizard performs some of the same actions as
the Master Server Wizard, including the following:
It ensures that the SQL Server versions on the two servers are compatible.
It ensures that the SQL Server Agent on the master server is running.
It ensures that the Agent Startup account has rights to log in as a target server.
It enlists the target server.
Creating Multiserver Jobs
After setting up the master
and target servers, you can create jobs on the master server and specify
which target servers they should run on. Periodically, the target
servers poll the master server. If any jobs defined for them have been
scheduled to run since the last polling interval, the target server
downloads the jobs and runs them. When a job completes, the target
server uploads the job outcome status to the master server.
Event Forwarding
Event forwarding is
another multiserver feature that allows a single SQL Server instance to
process events for other servers in your SQL Server environment. This
involves the designation of an alerts management server to which other
servers can forward their events. You enable the alerts management
server by right-clicking the SQL Server Agent node and selecting Properties. When the Properties pages appears, you click the Advanced page (see Figure 3).
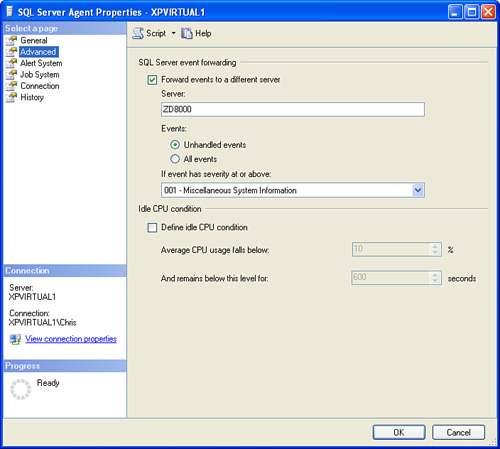
To configure event
forwarding, you select the Forward Events to a Different Server option
on the Advanced page. You can then select the SQL Server instance you
want as the alerts management server by using the Server drop-down. The
servers shown in the drop-down are those that have been registered in
SSMS. If the server you want does not appear in the drop-down, you need
to choose Registered Servers from the View menu and ensure that the
server is registered.
You can choose to
forward unhandled events, all events, or only a subset of the events.
The default is to send all unhandled events, but you can customize this
for your needs. You can further limit the messages that are forwarded by
specifying the severity level that the message must have in order to be
forwarded. For example, you can configure the servers to forward only
fatal error messages that have a severity greater than or equal to Level
19. In this scenario, you could define alerts on the alerts management
server that respond to these fatal errors and notify operators that
specialize in their resolution.
You need to consider a number
of trade-offs when using event forwarding. You need to weigh the
benefits of central administration and a lack of redundancy against the
disadvantages of having a single point of failure and increased network
traffic. The available network bandwidth, number of servers involved in
event forwarding, and stability of the alerts management server are some
of the key factors you need to think about in making your decision.